
Develop APIs with Your Team in Postman – Workshop Recap Part 1
We just completed our online workshop series!
In case you missed our 3-part, live workshop series, you can follow along with this post or watch the recording. In this post, I’ll walk you through how you can import a schema, save example responses, create descriptions, share your collection with others, create workspaces, comment on collections, and quickly create documentation.
This post is the first of three posts that will cover the topics from the recent Postman workshop series. I will cover part 1: Develop APIs with Your Team in Postman, part 2: Collaborate Better with Postman Version Control, and part 3: Powering Mocking, Monitoring, CI/CD, and Other Tasks with Collaborative Collections.
Importing a Schema
Before you begin, make sure you’ve opened your Postman app and sign in. You’ll need a free Postman account for some of the features we’re going through. Make sure you have the latest version of Postman installed.
1) Press Import in the app and select Paste Raw Text.
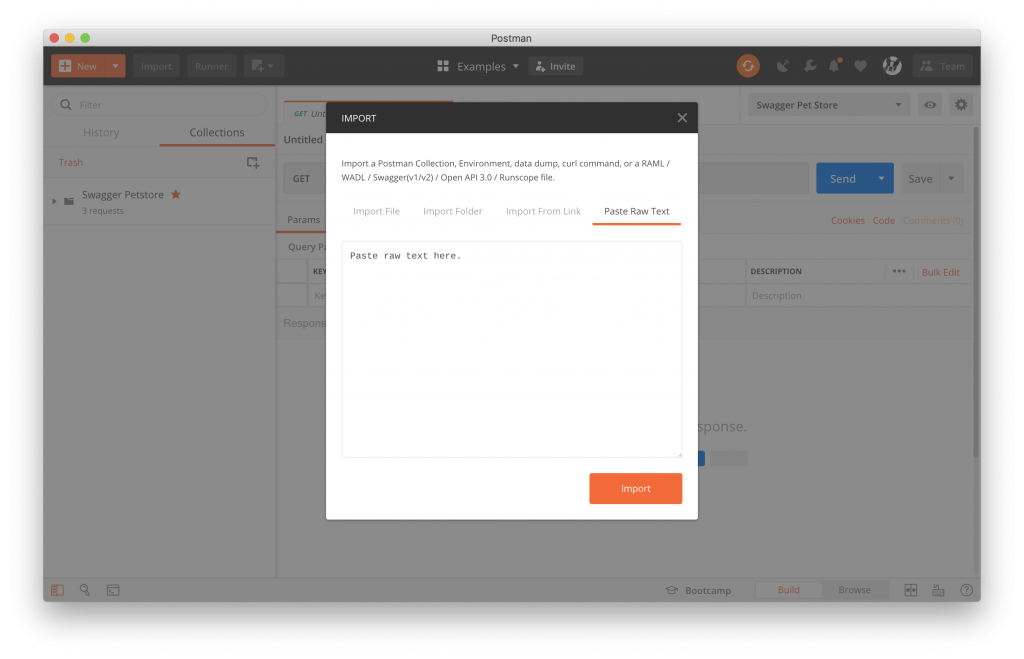
You have several options for importing a schema (import a file, a folder, from a link, or raw text). In this example, we’re going to select Paste Raw Text, and paste the Swagger schema you copied into the text box.
2) Copy and paste the Swagger Petstore schema into the raw text window.
In this example, we will use the Swagger schema from the Swagger Pet Store. Copy the schema from here:
openapi: "3.0.0"
info:
version: 1.0.0
title: Swagger Petstore
license:
name: MIT
servers:
- url: http://petstore.swagger.io/v1
paths:
/pets:
get:
summary: List all pets
operationId: listPets
tags:
- pets
parameters:
- name: limit
in: query
description: How many items to return at one time (max 100)
required: false
schema:
type: integer
format: int32
responses:
'200':
description: A paged array of pets
headers:
x-next:
description: A link to the next page of responses
schema:
type: string
content:
application/json:
schema:
$ref: "#/components/schemas/Pets"
default:
description: unexpected error
content:
application/json:
schema:
$ref: "#/components/schemas/Error"
post:
summary: Create a pet
operationId: createPets
tags:
- pets
responses:
'201':
description: Null response
default:
description: unexpected error
content:
application/json:
schema:
$ref: "#/components/schemas/Error"
/pets/{petId}:
get:
summary: Info for a specific pet
operationId: showPetById
tags:
- pets
parameters:
- name: petId
in: path
required: true
description: The id of the pet to retrieve
schema:
type: string
responses:
'200':
description: Expected response to a valid request
content:
application/json:
schema:
$ref: "#/components/schemas/Pets"
default:
description: unexpected error
content:
application/json:
schema:
$ref: "#/components/schemas/Error"
components:
schemas:
Pet:
required:
- id
- name
properties:
id:
type: integer
format: int64
name:
type: string
tag:
type: string
Pets:
type: array
items:
$ref: "#/components/schemas/Pet"
Error:
required:
- code
- message
properties:
code:
type: integer
format: int32
message:
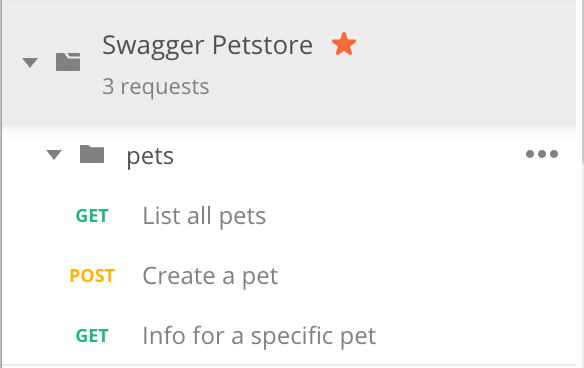
type: string3) Import your schema to generate a collection.
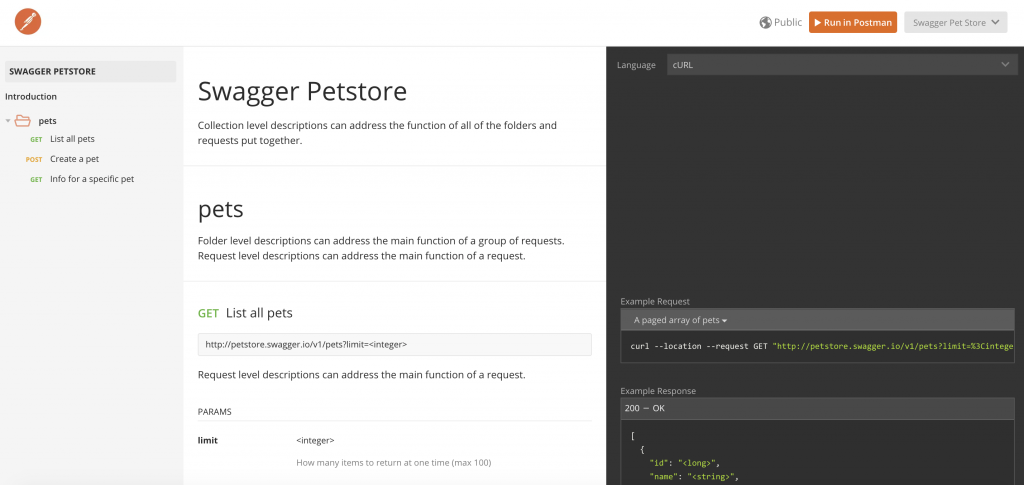
Now, press Import. Your imported schema should now show up as a new collection that looks like this:
Your imported collection will include descriptions from the schema in Postman’s description fields.
OpenAPI requires that you state the type of field but Postman doesn’t use the same requirements. In order to accommodate these values, Postman imports the field type from your OpenAPI schema in carrots (ex: <integer>) under the value section of your parameters.
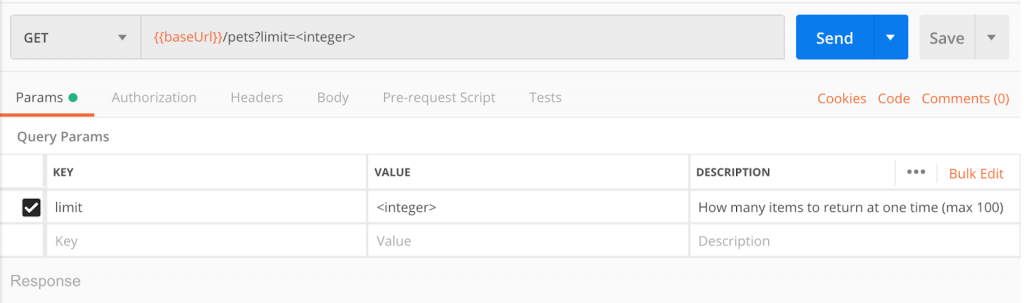
When you import the Swagger Pet Store schema, Postman will automatically store the baseURL as a variable.
Creating Examples
When you import a schema into Postman, any examples that are included in the schema will automatically be logged under the Examples drop-down. In this particular example, you’ll see that 2 example responses are included: a paged array of pets example, and an unexpected error example.
1) Send a request in Postman.
Creating your own examples is easy. When you send a request in Postman, you’ll get a response body that you can save and log as an example response for your endpoint.
2) Save your response body.
You can either press Add Example in the Examples dropdown, or press Save in the menu bar above the response body (see below).

Examples are especially useful when you share your collection or create documentation.
Adding Descriptions
Descriptions, like examples, are excellent ways to show and share your work with others. In addition, descriptions will appear in your documentation – making it that much more useful.
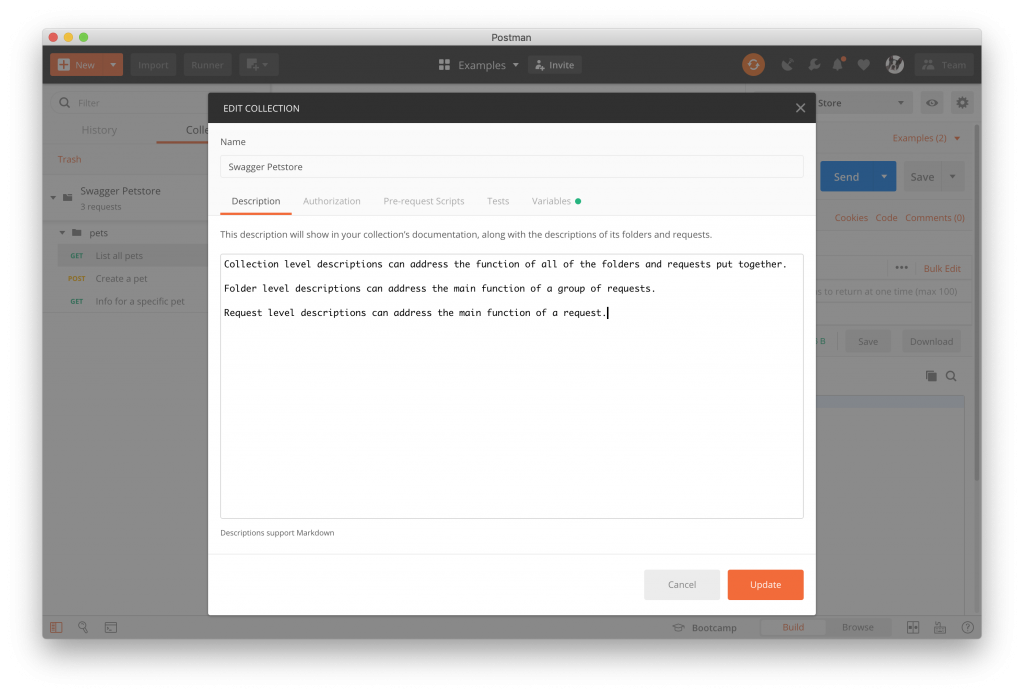
Descriptions can appear on different levels: request level, folder level, and collection level. The description capability supports markdown so you write in rich text, deep link, add images, and more.
1) Click on the ellipsis (…) next to your collection, folder, or request and select Edit.
A small window like the image below will pop up.
2) Add your description.
Your description will help you keep track of the different functions of your collections, folders, and requests – and will prove very useful to others when sharing or collaborating.
Sharing with Others
There are several ways to share a collection in Postman.
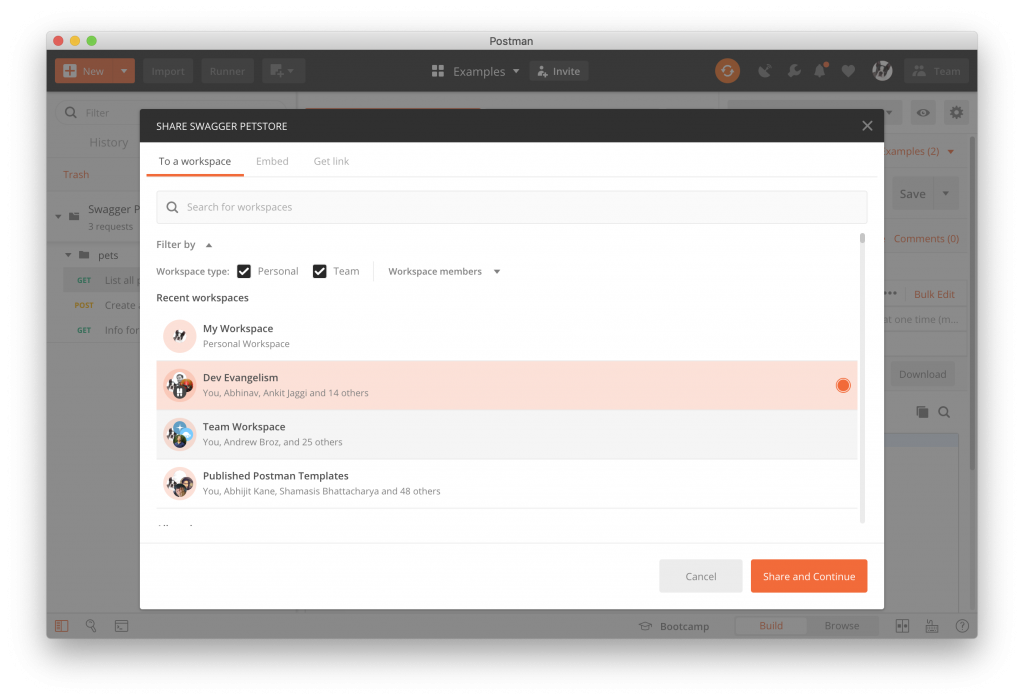
1) Click on the ellipsis (…) next to your collection and select Share Collection.
A window will pop up so you can choose to share with a workspace, embed a Run in Postman button, or share via link.
2) Choose your method, and share!
Learn how each method differs below:

Share with a Workspace
You can share with people on your team by sharing with a team workspace. This is most helpful when you are continuing to work on a project and want to collaborate. Depending on the permissions your assign, this option allows others to contribute and work on your collection and helps you and your team maintain a single source of truth.
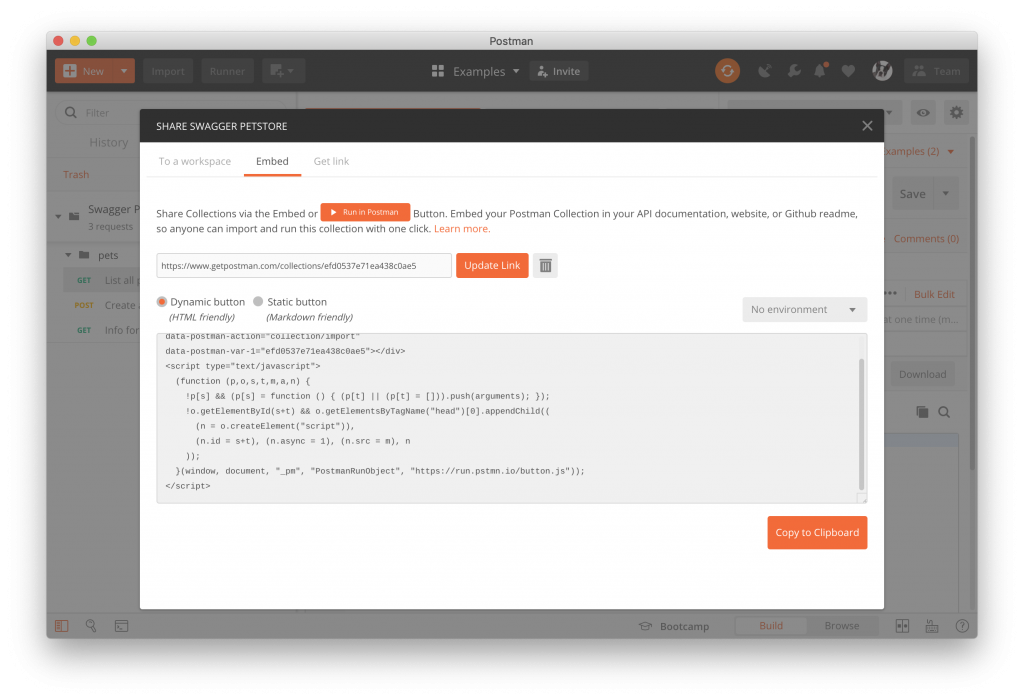
Run in Postman Button
You can share with other people outside of your team by embedding a Run in Postman button on your website. This allows anyone to view and work with a duplicate of your collection. Sharing this way will not affect your original collection.
With the Run in Postman button, you can choose whether or not you want a dynamic button or a static button. The Dynamic button uses HTML and CSS and works well if you want to add the button to your own website and you have permissions to edit the source code of the site. The Static button uses markdown and works well if you need to add the button to a markdown document, such as a README file in your Github or Bitbucket repository.
Share with a Link
The third way to share your collection is with a link. Postman automatically generates a unique link for you to share with anyone. Just like the Run in Postman button, this allows people to view and work with a duplicate of your collection but sharing this way will not affect your original collection.
Sharing with a link does not allow you to create a dynamic button so this will create a static button in markdown.

Creating Workspaces
Postman offers both personal and team workspaces. Having separate workspaces for personal work, for different projects, or for different teams that you’re a part of helps individuals and teams stay organized. Workspaces also ensure privacy (using private workspaces), allow for collaboration (using team workspaces), and can act as a source of truth between you and any collaborators (using team workspaces).
1) Click on the Workspaces dropdown.

You’ll see an option to create a new private or team workspace. Select your preference. You can always create more workspaces later on.
2) Name your workspace and give it a description.
If you create a team workspace, invite your teammates by entering their emails. Or you can create a private workspace to keep your own work organized. You can even explore public workspaces to join.
3) Set your permissions (in a team workspace).
Workspaces are also a great way to establish permissions. Permissions can be given at the collection level, team level, and workspace level.
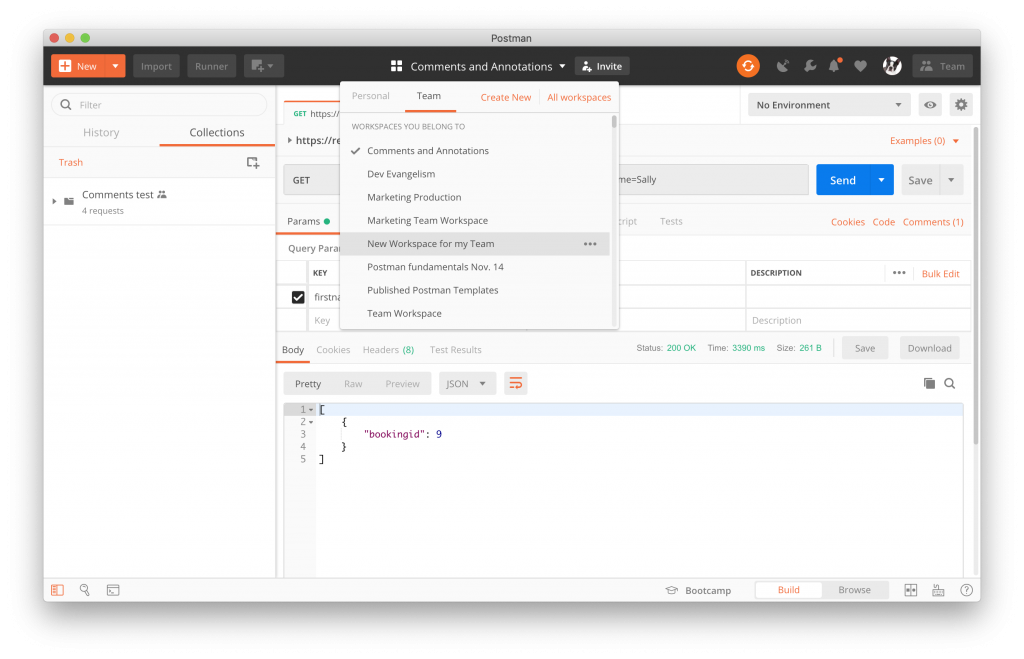
Adding Comments to Collections
If you work with a team, collaboration efforts can be difficult to organize. Postman makes internal collaboration easy. The commenting feature allows you to add and edit comments, feedback, and code reviews. Your comments display on both your Postman app and the dashboard.
1) Go into your team workspace and select a request in a shared collection.
You’ll see a Comments option next to Cookies and Code.
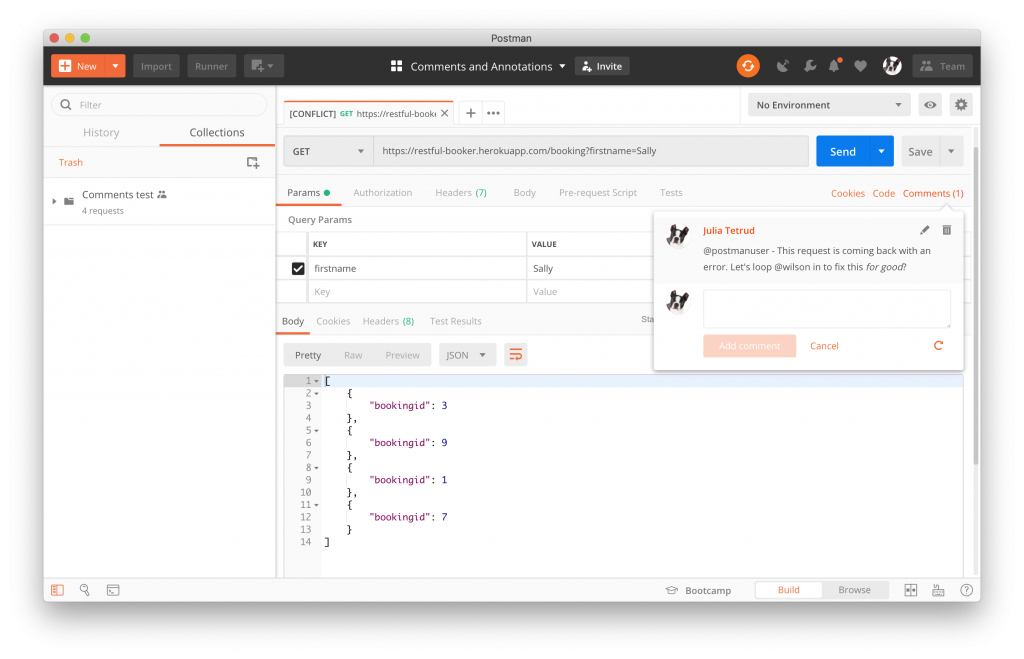
2) Press the Comments button.
3) Add your comment.
Postman’s commenting feature supports Markdown, so you can use @ to tag and notify teammates and write in rich text.
Generating API Documentation
When you are finished with your collection, you can generate documentation easily with Postman. All of the examples and descriptions that you add to your collection will populate in your documentation so anyone using your API can easily understand each request, the expected responses, the necessary parameters to add, etc.
1) To generate API documentation, select the ellipsis (…) next to your collection and select Publish Docs.
2) Choose your environment and fill in your details.
You’ll be taken to a page in your browser where you can choose an environment to add to your documentation, you can create a custom domain (available for Pro and Enterprise users), customize your privacy and discoverability, and style your API documentation page. Once you’ve customized your documentation page, just press Publish Collection!
3) Share your documentation with others!
The best part about Postman API Documentation is that it automatically updates parameters, descriptions, and examples as you update your collection, so you won’t have to manually change things as you continue development. Not only does this save you time, but it saves your users the pain of sifting through versions and undocumented changes just to use your service.
And there you have it! Stay tuned for Part 2: Collaborate Better with Postman Version Control, and Part 3: Powering Mocking, Monitoring, CI/CD, and Other Tasks with Collaborative Collections.
What do you think about this topic? Tell us in a comment below.